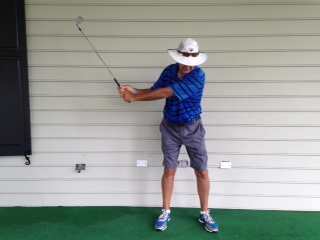
Yardages Control

When you play a golf course it is always good to know how they mark the yardage’s on the golf courses. Players have chosen for helping determine a holes yardage’s. Some golf courses uses stones to mark 100, 150, 200 etc. Other golf courses just mark 150 yards with a stick. While others go and mark the sprinkler heads.  Another option is using a range finder or gps. When you know how the golf courses are marked then you can start to determine where you are on each hole and what club to choose.

Now, depending on the type of player you are the yardage can mean different things. If you look at the picture above, I marked an X where the ball has landed and written the yardage to the hole: 50 yards. Most of us would take out our 50 yard shot and hit the ball. But what we are not accounting for is including the yardage of the ball after it hits the ground. When I am teaching a player on the golf course, I am noticing the students are hitting a 50 yard shot but when the ball lands it will roll more and either roll to far past the hole or even over the green. Then they look at me and said I hit the right shot but it didn’t work. While, they are not accounting for the extra distance when the ball lands. Therefore, if they took a PW and hit a 50 yard shot, the ball will roll at least 10-20 more feet if not more. Therefore they should be landing the ball either in the front of the green or the middle of the green. Therefore the player should be landing the ball at 30 or 40 yards and letting the ball roll to the hole. Each player has to determine their own yardage by including these three factors: the performance of the club, how the ball will react, and the condition of the golf course.

1st Checkpoint for Ensuring Proper Loft

As a teacher we begin to check our student’s swing through grip and setup. The first major checkpoint is the location of club face as the student transition to the backswing. This position can effect your entire golf swing. If the club face is not setting properly it is very hard to get the club face back to square at impact.

I took a picture of the correct positioning. Look at the club face (flat part of the head) is facing forward. The toe of the club (the top of the head) is pointing up and the heel (the bottom part of the head) is pointing down. This starts the club face properly, which ensures you are using your shoulders to swing back and not your hands and wrists.  Therefore, you are starting with a club face that can now get set for a good backswing and hopefully a better club face at impact.

Personal Par

So sorry for the lapse in posts, but it has been a couple of crazy weeks. Irma came through the south and luckily we survived here in the low country. Our thoughts and prayers go out to everyone that has been effected and hope they can get back into the swing of things sooner than later.

As we have watched golf on TV, even the professionals have a hard time shooting par. Therefore this blog is about shooting your personal par. Even though, our ultimate goal is shooting par, it takes time, practice, and patience to lower your score.

Take your scorecard of the course you are going to play and change your par. If you look at the picture above, I have changed a couple holes to bogey because I feel that these holes give my student a little trouble and if he/she had an extra stroke, it would ease their mind and allow the student to play the hole their own way. After I change the par, his/her goal is to shoot 80 which is a great goal for him/her right now. This is all about de-stressing yourself while you play. If a hole is too long and you have trouble getting to the green in 2 shots, then allow yourself an extra shot. Who knows, in the end, you might not need the extra stroke after all. Plus, this hopefully will also allow yourself to avoid getting a double bogey or more because you are so worried about shooting par. After a couple rounds, then you might want to change your personal par a little lower to challenge yourself.

There are many different forms of this personal par, such as playing 5’s: every whole is a 5 and if you get a 5 on every whole you shoot a 90. Another way is just add an extra stroke to each hole – bogey golf = 90 on 18 holes. I personally have done this my whole career. It has helped me and my students start to shoot lower without overwhelming yourself with shooting the “professional par”.

“The Grip”

One of the hardest things for me to teach any student is to hold your golf club properly with little pressure. Most golfers, including myself, grip the club to “death”. When we do this, the club becomes stiff and changes the dynamic of the golf club. It is very similar to holding a tambourine. When you hold the tambourine tight and shake it, the tambourine does not sound proper- it is clunky and short. Now if you hold it gently and shake it plays its proper music. A correct grip pressure is light and relaxed. Some people say it is like holding a baby bird, a full tube of toothpaste, or a shopping bag/ briefcase.  I promise you will not throw the club if you do this, providing the grips are in good condition.

Now, we can look at our grips to help us aid in not holding it tight. Especially as the summer comes to an end, it is time to check your grips. If you see the picture above, this is a worn out grip. This can effect your grip pressure tremendously. A worn out grip has no grip left- the sticky stuff. When this happens you will have to grip tighter just because your grips are worn. Especially after a hot summer, our grips can get slippery from our hands. First, you can wash your grips to clean all the sweat, dirt, etc. off of them. Take your kitchen dish soap and a good scrub brush. Put your grips under the running water and with soap scrub them until the water turns a lighter grey and set them on a towel to dry over night. By the morning if your grips are still in good condition they should feel better so you do not have to grip as tight.  If they are not better or have worn spots like the picture above it is time get new grips, which most golf shops can do for you in less than a day.

Ensuring your swing is starting on “Plane”

If you ever have played with me this is my drill of choice to improve my swing. I have always been a flat plane swinger (I love playing softball)! You will find me doing this before every round of golf I play for a couple minutes.

For those who do not know what “plane” means the definition is the path that your club swings on. Most people are so used to playing softball, tennis, racquetball etc. Most common swings in various sports are horizontal swings with the ball in mid air. Golf is not like these sports. The ball is on the ground, therefore we must swing a little more vertical so that our club goes up and then “what goes up must come down” and hit the ball. To ensure you are starting your swing on plane stand up with your butt brushing against a wall (a wall you can hit and not damage or don’t mind it gets damaged a little). Then get in your setup position with club. Swing back halfway. Your club on the backswing should not hit the wall at all, and technically should be parallel to the wall. If you have hit the wall anywhere you are not taking your club back on plane.  I love this drill because you can keep your eye on the wall and feel what the backswing should feel like. If you hit the wall, you will feel it is wrong and be able to try to fix it without technically having to look at it.

Stay tuned for future blog on how the wall can help you follow through better too!

Finish like a Pro

This is a great week for golf. Masters week! I tell everyone, even if you don’t watch golf, this is the week to at least take a peak!   It is beautiful, exciting, and eventful.

Of course after watching a great event, we all get excited to go out and play like the pros. The biggest take away from watching the greats play golf is how amazing they complete their golf swing. I try to do my best on every swing, such as this picture above. My weight is completely transferred, my hips and chest are pointed at the target, and I am watching my ball land right next to the hole posing for the camera! On each students full swing, this is how we want to finish! Check yourself out and see where you finish. Watch the masters, see where they finish.

Alignment

First thing is first, setup and alignment. Normally I would talk about setup first but a lot of golfers out there struggle more with alignment than anything. When a student comes to me and is worried about the direction of the ball, my first question is where are you aiming. Sometimes, they look at me and go, “Straight!” ….. well what is straight. First you need to always pick a target. In this picture it is the red flag. Now, we need to setup the ball to go towards the red flag. I put down an orange stick in front of the ball to verify that the ball is going towards the flag. Now I can setup my body PARALLEL (orange stick on left) to the intended target line (orange stick on right). Thus making parallel lines, with the ball going towards the flag or some people like to say “Railroad Tracks”. Most students, end up aiming their body at the target therefore their ball will go to the right. When I am practicing this is what I do first to ensure I am setting up properly. I can either hit the ball (please make sure the orange stick on right is far enough in front of the ball that it won’t be hit) or I can pick up the orange stick on the right and just practice with the stick on the left for my body. After I practice my swing with the sticks, then I pick up the sticks and go through a pre-shot routine to practice aiming without and aid. Always practice with a stick or something on the ground if you are not going to go through your aiming process. This will allow you to hit balls and work on your stroke without having to think of too many things.

PS: If you are a left handed player, it is flipped!!